Learning Japanese with AppleScript and Simplenote
May 27, 2018 · 7 min read
If you happen to be using macOS and learning Japanese, you may have used the ウィズダム英和辞典 / The Wisdom English-Japanese Dictionary from macOS's default Dictionary app. It's an awesome dictionary!
When I didn't understand a Japanese word from an article or a TV show, I would perform the following actions...
- Open the Dictionary app
- Type the word I am searching for
- Use my mouse to highlight the definition
- Open Simplenote, a minimalist note taking app
- Create a new note
- Paste the definition
...All of this just so I can review it in the future! 🙂
Let's try to automate this process with the Automator.
Prerequisites
- macOS 🖥
- Simplenote
Getting Started
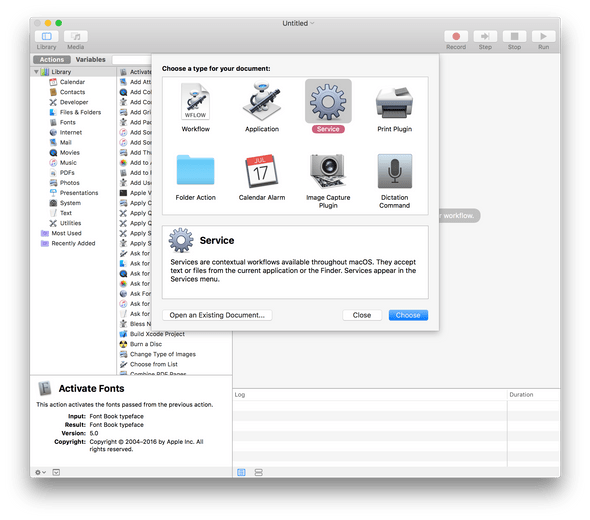
- Open Automator.
- Choose Service for the type of document.
- Once selected, on the top of your workspace, you will see
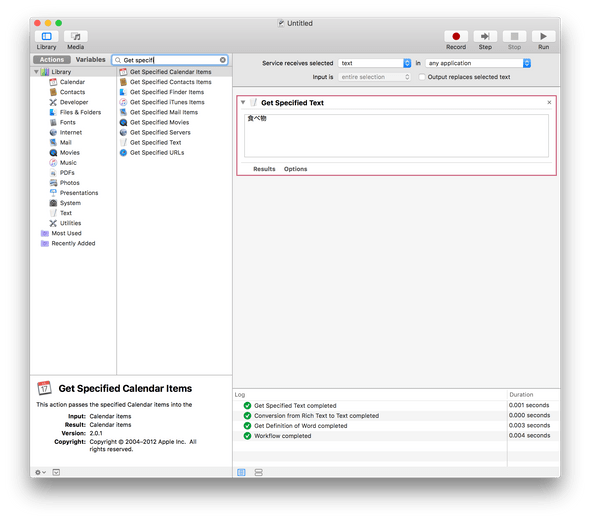
Service receives selected text from any application. Since we are dealing with text in this scenario, we can leave it as is. - In the search bar on the top left beside the
ActionsandVariablestab, search for the action calledGet Specified Text. - Drag
Get Specified Textonto the gray space to the right. The gray box shows your workflow. - Type whatever vocabulary you want to search in the newly dropped
Get Specified Text. I chose 食べ物.
- Go back to the search bar and search for
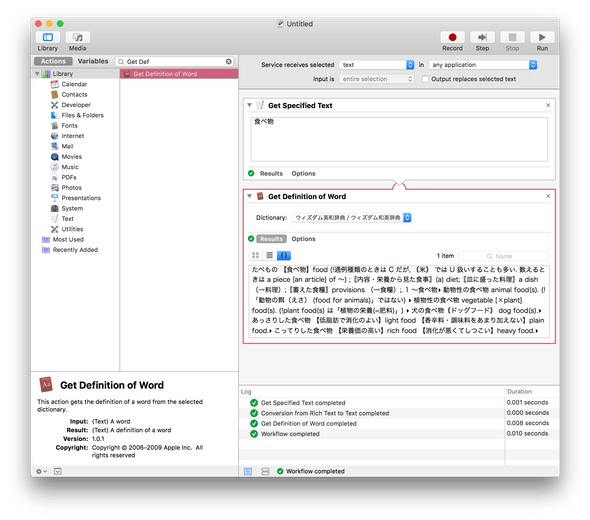
Get Definition of Wordand drag it below your current workflow. You should seeGet Specified Textconnect withGet Definition of Wordfrom a UI perspective. - In
Get Definition of Word, set the type of Dictionary toウィズダム英和辞典/ウィズダム和英辞典. You have just created the first part of your workflow! Let's try executing it. - Click on the ▶️
Runbutton on the top right to execute the flow. - Click on the
Resultstab onGet Definition of Wordbox. - Click on the
{ }tab right below it.
- You will notice that we got our definition back!
Get Specified Textpassed the value食べ物in my case toGet Definition of Word. Unfortunately, the formatting is cleared with one long string as a result. - We will have to reformat it slightly to make it somewhat legible and I'm going to use JavaScript. In the search bar, search for
Run JavaScriptand drag it belowGet Definition of Word - Paste the following code below into
Run JavaScript. I won't go into the details of the logic of the code, but it reformats the string into a more legible format. It can definitely be optimized further, but this will work for now! When executed, therunfunction will be called, thus reformatting the code.
function run(input, parameters) {
  const stringifiedInput = input.toString()
  let title = ''
  let body = ''
  let firstSpaceIndex = null
  const indexOfFirstSemicolon = stringifiedInput.indexOf(';')
  const textBeforeFirstSemicolon = stringifiedInput.slice(
    0,
    indexOfFirstSemicolon
  )
  const textAfterFirstSemicolon = stringifiedInput.slice(
    indexOfFirstSemicolon + 1
  )
  const indexOfJapaneseCloseSquareBracket = textBeforeFirstSemicolon.indexOf(
    '】'
  )
  const hasJapaneseBracket = indexOfJapaneseCloseSquareBracket > -1
  if (!hasJapaneseBracket) {
    firstSpaceIndex = textBeforeFirstSemicolon.indexOf(' ')
    title = textBeforeFirstSemicolon.slice(0, firstSpaceIndex)
    body = stringifiedInput.slice(firstSpaceIndex)
  } else {
    title = textBeforeFirstSemicolon.slice(
      0,
      indexOfJapaneseCloseSquareBracket + 1
    )
    body = stringifiedInput.slice(indexOfJapaneseCloseSquareBracket + 1)
  }
  body = body.split(/([0-9]\s|[①-⑩]|[▸.])/g)
  let result = ''
  for (let i = 0; i < body.length; i++) {
    if (body[i].match(/([0-9]\s)/gi)) {
      result += `\n\n${body[i]}`
    } else if (
      body[i].match(/([①-⑩])/gi) ||
      ((body[i] === '▸' && body[i - 1] === '.') ||
        (body[i] === '▸' && body[i - 2] === '.'))
    ) {
      result += `\n${body[i]}`
    } else if (
      body[i] === '.' &&
      body[i - 2] !== '▸' &&
      body[i - 1] !== '▸' &&
      body[i - 1][body[i - 1].length - 1] !== ';'
    ) {
      result += `${body[i]}\n`
    } else if (body[i] === '】') {
      result += `${body[i]}\n`
    } else {
      result += body[i]
    }
  }
  if (result[0] === '\n') {
    return `${title}${result}`
  }
  return `${title}\n\n${result}`
}- In the search bar, search for
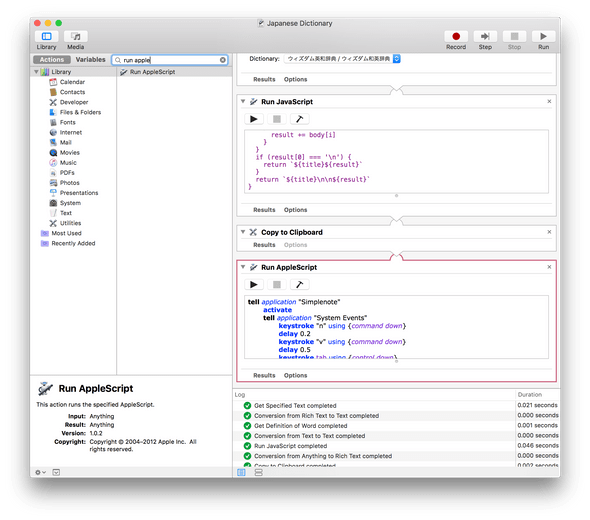
Copy to Clipboardand drag it belowRun JavaScript.Copy to Clipboardcopies the output fromRun JavaScript. - All that is left is to paste what we copied to Simplenote. Unfortunately, there isn't a
Pasteaction, so this is where AppleScript comes into play. - In the search bar, search for
Run AppleScriptand drag it belowCopy to Clipboard. Copy the code below intoRun AppleScript.
tell application "Simplenote"
  activate
  tell application "System Events"
    keystroke "n" using {command down}
    delay 0.2
    keystroke "v" using {command down}
    delay 0.5
    keystroke tab using {control down}
    keystroke "Japanese"
    delay 0.7
    keystroke return
    keystroke tab
  end tell
end tell
The code above does the following...
- Open Simplenote
- Create a new Note
- Paste the Definition
- Selects the
Tagsection of the Note and name itJapanese - Blur focus from the
Tagsection
I added in the delay calls, because AppleScript seems to skip over commands, when a keystroke causes a UI change.
If you prefer to use a different note app, you can technically replace tell application "Simplenote" with your preferred app name like tell application "Note"
The code below is unique to Simplenote, so you should delete it if you want to paste to your own app.
keystroke tab using {control down}
keystroke "Japanese"
delay 0.7
keystroke return
keystroke tab- Execute the flow with ▶️
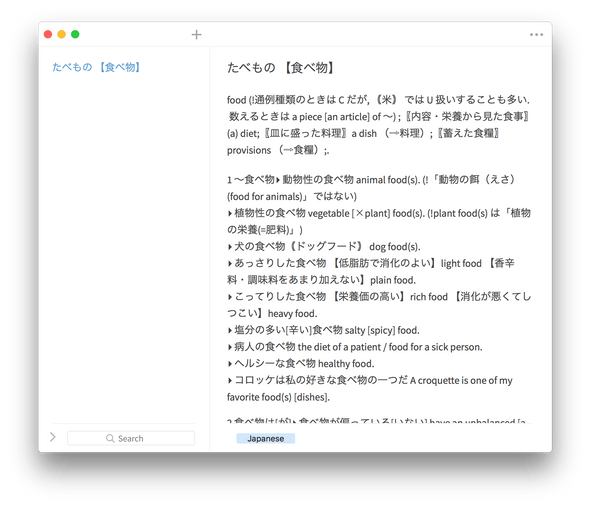
Runon the top right, and you should see your definition saved in Simplenote with it tagged!
Get Specified Textwas only used for debugging purposes so remove it from the workflow by clicking on the ╳ on the top right corner orGet Specified Text- Save your newly created Service. I named mine Japanese Dictionary.
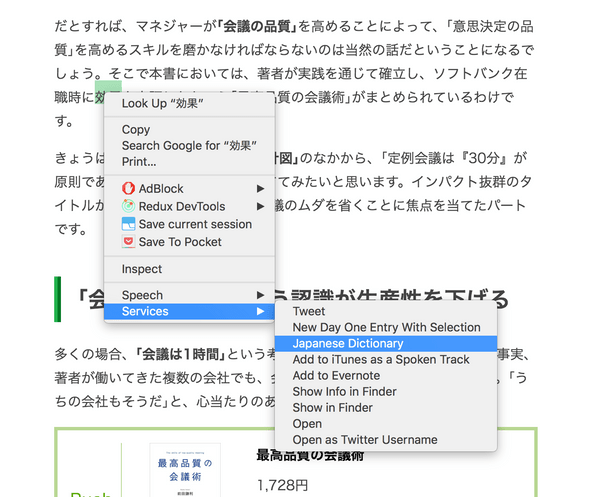
- Now the Service is accessible in the context menu in your applications under the Service section, when you
right-click. It is useful when looking up Japanese words from a browser.
-
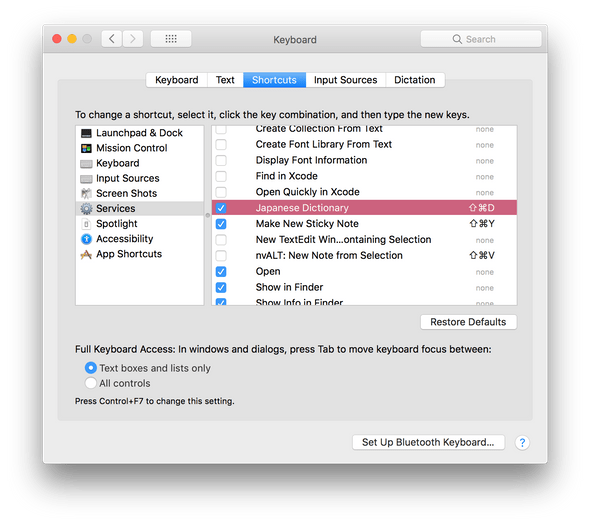
You can also activate a Service through a keyboard shortcut.
- Open System Preferences > Keyboard > Shortcuts.
- Click on Services on the Left Menu.
- Scroll down to the Text section and select your Service.
- Add a keyboard shortcut
Mine is set to Command + Shift + D, which might not work depending on the application you have opened as the application's keyboard shortcuts may override it.
The use case for the keyboard shortcut is when you are using the Dictionary app. If you decide to save the word, just highlight the word and use the shortcut command to save it to Simplenote. You save a few clicks. 😊
That being said though...I do sometimes run into errors, where the AppleScript doesn't seem to execute sequentially as if it the code was running asynchronously, so my quick fixes were to mess with the delay time.
Depending on the way you want things to work, just experiment with Automator! You don't have to save words the way I do. The only part I really had to code for was the JavaScript part but that's because I had to reformat the text. The AppleScript part is pretty self explanatory for the most part.
Anyways, the whole point of this article was to make your 日本語 studies more convenient.
Good Luck!
